
One thing that every naturalista should know is how to pull off one protective style on their own for when your needs a break, or if you can’t seem to master braid/twist-outs…which is the boat that I fall in. So I’m so thankful I finally found a style I can manage.

A little backstory, I’ve been natural for about 5 years and my hair texture at first was a little thicker than I could manage. It took quite a few years for it to grow and from straightening, the texture became more manageable. The down side is that the last time I went to have my hair straightened in the spring, it caused long term damage to my hair. The second time I went to that salon, they asked if I wanted them “to add something to loosen my hair to the shampoo”…
“No, ma’am!”
This should have been a sign that good things would not come after leaving the chair. Although my hair was lustrous and straight for a few weeks, the damage was done. Not only did I have straight pieces, but as I combed my hair the other day, much to my dismay, I also discovered major breakage in the back. Safe to say, my hair can’t be left out and is need of a consultation… But in the meantime I figured out how to do a quick and easy protective style.
What is needed:
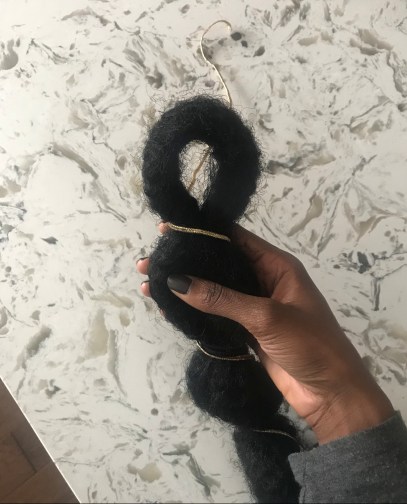
Pack of Kinky Marley Hair or synthetic hair of your choice (if you want it thicker use two), get from Beauty Supply Shop
Edge Tamer, I’m using the TGIN one now
Gold trimming- from a craft store
5 hair ties

- Open the pack of hair, and create the pony, by tying a hair tie about two inches from the top of the hair pack. The goal is to create a loop, that you will be using to put around your bun so eyeball how big you think your bun will be. Continue to add hair ties about two inches apart to the end of the hair.
2. On freshly washed hair, add leave-in and a bit of water. The key is that your hair can’t be dry before adding the gel or it will be flake central! For me because my hair is thick, I brush it into two to three ponies in order to create a flater bun.
3. Add the gel. you can also add a bit as you brush the hair into a bun. Then top it off once your hair is in the bun. Make sure the bun is tight.
4. Add the pony by placing the loop around the bun. Make sure that the loop is a good fit. Then add bobby pins and an extra hair tie to secure it.

5. The fun part! Wrap the gold trimming around the pony and secure it at the top by securing it under the hair tie or with a bobby pin. Go over your edges with edge tamer and then put on a silk scarf to let the gel set.

The finished product is this chic pony, that looks a lot fancier than the input!
I didn’t have any issues with this coming off and I redid it during time that I wore it. I also got a lot of compliments, much to my content because I rarely get natural hair comments lol.
Give it a try!

